Inky Moose On Facebook

Find me on Facebook where you can get inspiration, class updates and other crafty goodness!

Monday, July 19, 2010

Butterfly Beautiful

I was asked recently to create a Thank You gift for a woman who loves butterflies. Immediately I thought of using 'All a Flutter' (from the Summer Mini) and casing an idea I had seen on Splitcoast Stampers a while ago that caught my eye.
I wanted 2 butterflies for each card and one for the card holder so I stamped them with Basic Grey ink (my stock standard version of "black") on water colour paper and began the process of colouring each one in.

My experience at water colouring is quite limited but I am thrilled with how these winged wonders turned out.

The next step was to stamp the background and sponge the edges to give them an aged look. Because I cut the water coloured butterflies out, I needed to stamp the image on the background so I could get antennas. To do this I stamped the image on a scrap piece of card stock and cut them out. I adhered them to the background piece where I wanted my butterflies to go and then stamped my background image. I did this for each card and two of them were less successful than the others, but thats what you get with hand crafted masterpieces right?!
Now it was just a matter of matting my pieces and adhering them to their bases. Simple!
I love how the butterflies seem to float above their backgrounds.
This is the finished product ... simply Butterfly Beautiful!

He's Just so Hoot, Hoot, Cute!

I know I said that the remaining two cards for the Card Keeper would be a surprise, but I just have to give you a sneaky peak as this guy is so darn cute!
Can you also find all the new products I've used? I'll give you a clue, there's 5 of them.
So, what do you think?! Cute enough to hoot about or not?

Wednesday, July 14, 2010

Cards for the Card Keeper Class

I have been waiting, waiting, waiting for my latest order to arrive so I can play with the new product I've ordered. In the meantime I have created some cards to go in the Card Keeper those of you that are coming to my next class, will make.
The general consensus was there had to be a Sympathy card, so here is what I came up with:
I have used Whisper White with the gorgoeus Baja Breeze. I find they complement each other so beautifully.
I've kept the layout fairly simple going for a more sombre tone.

I thought a collection of cards wouldn't be complete without a Christmas card so I've come up with this beauty to go into the box:
This is a Z - fold card and the button on the right holds the front flap closed until the recipient opens it to reveal a message. It is such an easy card to make and I love the result. It's just a little bit different which makes it a little bit more interesting than a regular card. I've used SU!'s 'Big on Christmas' stamp set also, to give this card maximum impact.

Monday, July 5, 2010

Card Keeper Class


Do you want to use some of the brand new SU! products from the latest catalogue? Are you ready for another All Day Card Class? I have the answer for you ... My upcoming 'Card Keeper Class'!


This funky box is the project for the day. It holds 12 dividers (one for each month) for you to sort your cards into and there is room on each divider to write the cards you'll need for that month if you want to. The box holds about 20 cards/envelopes when full.
You'll make 5 cards to get you started .
What a gorgeous way to keep the cards you make in order and at your finger tips!


Date - Saturday 31st July (Registrations close 20th July).

Time - 9.30 - 4.30pm

Cost - $35 for the day (all you need to bring is adhesive) and lunch is provided.
Places are limited so email now to reserve your seat!


Wednesday, June 30, 2010

Due to Popular Demand...


After posting the teacher gift sets I made on here, I have had several requests to run a class so people could make their own. So here it is!
You'll make 5 cute 3x3 cards with envelopes and a Top Note Purse to hold them. It's based on an idea I've seen in the brand new catalogue.
Isn't it just oh so cute?!


Wednesday, June 23, 2010

Sweet!


This is the first lot of wee gift cartons I have made using the cute milk carton die from SU!. I just think they are so darn sweet (excuse the pun!).
I've used the milk carton die and punched out a circle in the front and covered it with acetate to create a little window. There's nothing like having a wee peek at goodies inside to tempt the recipient!
Colours are Crushed Curry, Bermuda Bay and Rich Razzleberry. The stamp set covering the box is one of the Sprinkles stamps and the sentiment comes from the 'More the Merrier' Hostess set.

Simply ... Thank You


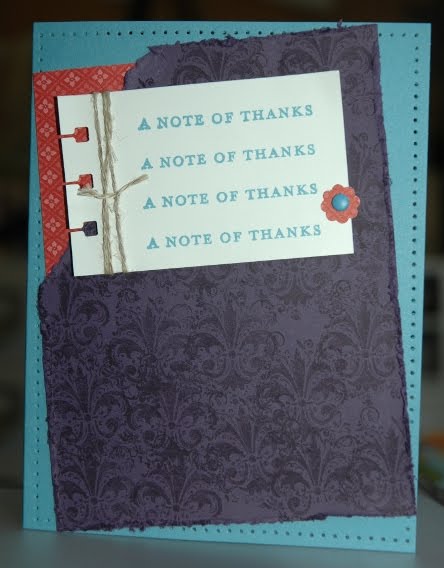
Here's a card I whipped up to give to as a thank you. I really like the colour combo so am going to have to remember it for future reference.
I played around with the front piece trying to choose between lining everything up straight or slanting some of the sections. Thought I'd be daring and go for a bit of a slant. I wonder whether I should have left the sentiment section straight but by the time I thought of it, it was too late as I had already stuck it down!
I've used Elegant Eggplant, Ruby Red (retiring but I can use another gorgeous red instead) and Marina Mist (I can see this is going to be my favourite new colour). Stamp sets are Extreme Elements and Thank You Kindly. My Stamp-a-ma-jig came in handy with lining up the sentiments!

I'm on the home stretch now with only a few gift boxes to make. I'll post one set I have made already. Enjoy!