Inky Moose On Facebook

Find me on Facebook where you can get inspiration, class updates and other crafty goodness!

Monday, March 28, 2011

Having An Egg-cellent Easter!

I know, it's a little corny for the title of a post, but it does have eggs in it!
With Easter next month I have an Easter Class on the schedule. It means cute wee gift boxes to fill with chocolatey goodness, mmmmm. With the release of the new Petal Cone die in the SU! mini it was a perfect time to see what I could come up with.

To create the gift box above, I've used the beautiful 'Springtime Vintage' DSP to create my cone and added some gorgeous satin ribbon and buttons. Every time I use the satin ribbon on a project I love the look it creates. It's so elegant and dresses up even the simplest creation. I even managed to colour coordinate the contents of the cone, though it did mean I had to eat the remaining colours in the bag (Not that I'm complaining! LOL)

To compliment the gift cone I made the following card:
I've used the same DSP paper pack and heat embossed the silhouette of the girl as the main image. It is difficult to see from this angle but the card is actually a pop-up card. It lays flat for posting but push the flower band up and and girl pops up to reveal a message.

Here's a side view to give you a better idea. The idea for this card came from one we did at a ASI Team get together and I have been wanting to use it for some time now. Isn't it great?!

Last but not least is another gift box. It reminds me of a Chinese Take Out box. Believe it or not, it is made with the same Petal Cone die as the other box.
I've heat embossed the sentiment and the cute egg, sponging over the egg to give it a bit more colour. I just love this wee box!
Class Details:

Dates: Wednesday 13th/ Thursday 14th April, 7 - 9.30 pm.
Cost: $22

Email me to reserve your seat!

Thursday, March 10, 2011

"Sew, Wooden" You Know It?

You'll have to excuse my play on words for the title of this post! It gives you an idea what the post is about though :).
With Spring nearly here (Yay!) it means craft fair season will be here before too long also.
I have one coming up in early April so have started to make items for it.
I have had loads of fun coming up with new and unique products that will hopefully tempt customers.
Here's few of the goodies I have made so far...
It took me a while to source all the bits I wanted for this but finally I got them all. It's my version of a sewing kit. Isn't it "sew" sweet! The top of the jar is a pin cushion made with SU!'s cute button fabric (I love it!) and is used to hold pins, whilst inside these are the contents...
Buttons, thread, pins, needles (in the wooden needle container), safety pins and even scissors. Everything you could want for that sewing emergency.

I had a few spare needle containers so I sanded them down, sponged them with ink and embossed an image on them. I have to say it was nerve racking stamping the image because you only got one shot at getting it right and centred and properly inked!
Here's what I managed to create:
I've put 5 needles in each and they are ready to sell. I'm really pleased with how they turned out.
Whilst we are still on "wood", this is my favourite item and I am keeping it for myself, but just had to share it...
It's an old fashioned wooden clothes peg that I have decorated in a similar fashion to the needle containers. I love the sentiment on it and just think my pretty peg is the cutest thing I have made in a long time :). It is going to sit on the mantle in my craft room.

Lastly I want to show you some canvas art I have been working on.
The inspiration for this came from a Sympathy card I made a wee while ago. I sponged my background first then stamped the tree in Versamark so I could heat emboss it. Some of the embossing powder stuck to the surrounding grass but I think it adds some extra dimension.

While I was busy creating my masterpiece, my DD's wanted to make one of their own too. I was amazed at the finished products. I stamped the image for them and they did the rest. I asked my eldest DD if I could post hers on my blog and she said yes, so I'm posting it now before she changes her mind!
Isn't it fantastic?! I love the sunset effect DD created as the background. Perfect for those cherry blossoms.
Thanks for taking a peek :)

Friday, March 4, 2011

Something Old, Something new, Something Blue...

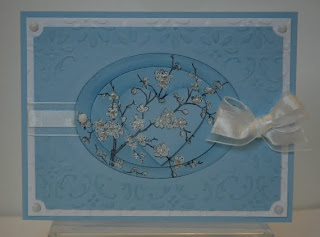
I said I would share the blue wedding card I was recently asked to create, so here it is.
It's quite different from my red card creation but still really like it.

I used 'Bashful Blue' as my main colour. I haven't used it in such a long time, tending to use my fave 'Baja Breeze', so it was nice to work with something different.
I used the blossom branch from the Easter set in the new mini and coloured the blossoms in with a white gel pen. I had stamped the image twice so I could punch out a heart to add as an additional layer. Getting those branches to line up was tricky. It's not perfectly matched but it is pretty close! I added the teeny tiny pearls to the centre of each blossom and sponged the embossing on the 'Bashful Blue' piece of cardstock to make it stand out a bit more.
Thanks for taking a peek :)

'Punch Bunch' Purse Class


Isn't this oh so sweet?!
It's a purse with 3x3 note cards that go inside. Cuteness in a package!
The purse is roomy enough to fit a decent amount of stuff in, including envelopes for the cards. It's not as roomy as a real purse but it's pretty darn good.

For my last workshop I made one of the purses as the hostess gift and of course all the guests wanted one of their own when they saw it. Isn't that the way?!
From that same workshop, the most popular set ordered from the Sale-a-braton catalogue was the cute 'Punch Bunch' set. I thought why not combine the two and make a class out of it, so that's what I did.
I've used the yummy 'In Colour' palette (paper, brads and ribbon) and each stamp from the set got inked up...

Who wouldn't love getting this as a gift?!
Interested in making your own paper purse, class details are below :)

Dates: Wednesday 30th /Thursday 31st March, 7 - 9.30pm
Cost: $20
Email me to reserve your seat!

Wednesday, March 2, 2011

The Queen of Hearts


Lately I have been busy lately with custom orders. I am not complaining because they are one of my favourite things to do. I get to create something really unique and tailored and because they are usually one-off's I get to go to town so to speak !
This was definitely the case with a wedding card I was recently asked to create. The client is a glass artisan and creates stunning modern pieces of art made out of glass. I recommend you check out her site and see for yourself! Needless to say, I wanted to make something just as stunning and eye catching for her.

I created the patterned paper myself by punching out various hearts and pasting them down. I then embossed a pattern onto it to give some texture. Boy did it take some time sticking and fitting all those hearts together! It was worth it though as I love the end result. I heat embossed two hearts, added some gorgeous satin ribbon, glitter brads and glitter paper, and here's the finished creation...
I also handmade an envelo-box to put it in. It's a hybrid box/envelope so the embellishments don't get crushed.

Now I have another custom order Wedding card to make, but this time it's blue. I'll post photos once I've made it. Thanks for stopping by and taking a peek!

Cupcakes, yummy, yummy!


Can you tell what this post is going to be about?!
Yep, cupcakes, mmmmm.
A dear friend of mine just celebrated her birthday this week so I can post the card I made for her now. I know she visits my blog and because she is so good and waits until her actual birthday to open what I send, the least I can do is wait to post it on my blog so I don't spoil the surprise.

I've used the cute new cupcake punch and the gorgeous glitter paper. I made a pedestal for the cupcakes to sit on with my scallop border punch and medium sized oval. I've also embossed the frosting (or icing for those of us not born and bred in the Northern hemisphere) of the centre cupcake. I sponged it with some pink ink also to highlight the texture. I love how it turned out. It nearly looks good enough to eat!

And since this post is about cupcakes, I'll share other projects I have made with my new fave punch...

These are party favours I recently made. Aren't they cute?! A little bit of glitter, some pearls and what more could party guests want? Oh, yes, something inside! I filled them with Smarties. So once the candy is gone, the container can be used for other treasures :).

Last but not least, I did a workshop a few weeks ago for Sale-a-braton, and yes, it centred around the cupcake punch...
So there you have it, cupcakes galore and not a crumb in sight!