


 Before anyone asks, 'Black Tie Embossing' isn't the name of some new kind of embossing technique, but rather a tempter of the goodies you'll be making in my upcoming class. They all have some kind of embossing on them AND they are formal like a Black Tie function!
Even better, when I checked out the new look Pals Paper Arts site I discovered their latest challenge... Day to Evening. Perfect!
For this class I have used the beautiful new set 'Just Believe' as it lends itself so well to being embossed. Nice strong, solid images to work with.
The first card incorporates heat embossing which gives the image that gorgeous 3D glossy effect. Teamed with SU!'s new vintage brads and oh so gorgeous satin ribbon, this card can show up to any Black Tie function with confidence.

The accompanying wee milk carton is like the little black dresses clutch purse! It was also made using heat embossing. So simple to do, yet so elegant.

Another form of embossing is Resist Embossing. This is where you stamp an image first (I've used the words) then you stamp another image over the first with Versamark. You then heat emboss clear powder over it. Just stunning if I do say so myself! The idea for this card came from Wendy.


A class on embossing simply wouldn't be complete without some Dry Embossing, so the last card for the class lets dry embossing shine.
 Day or night, this card makes a statement.
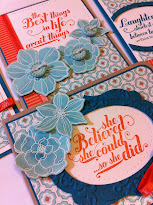
The sweet paper flower is made using the scallop circle punch. It's an idea I discovered on Mary's blog while checking out the latest PPA challenge. It's the perfect embellishment to finish off the card.
So, if you have some black tie events coming up or just want to create these beauties for yourself, email me to register for the class.
Wednesday 15th September 7 - 9.30 pm. $25


