Inky Moose On Facebook

Find me on Facebook where you can get inspiration, class updates and other crafty goodness!

Friday, May 27, 2011

The Embossibilities are Endless!

Finally I can upload my next class photos. I am not sure what was happening yesterday but whatever it was it's fixed today.
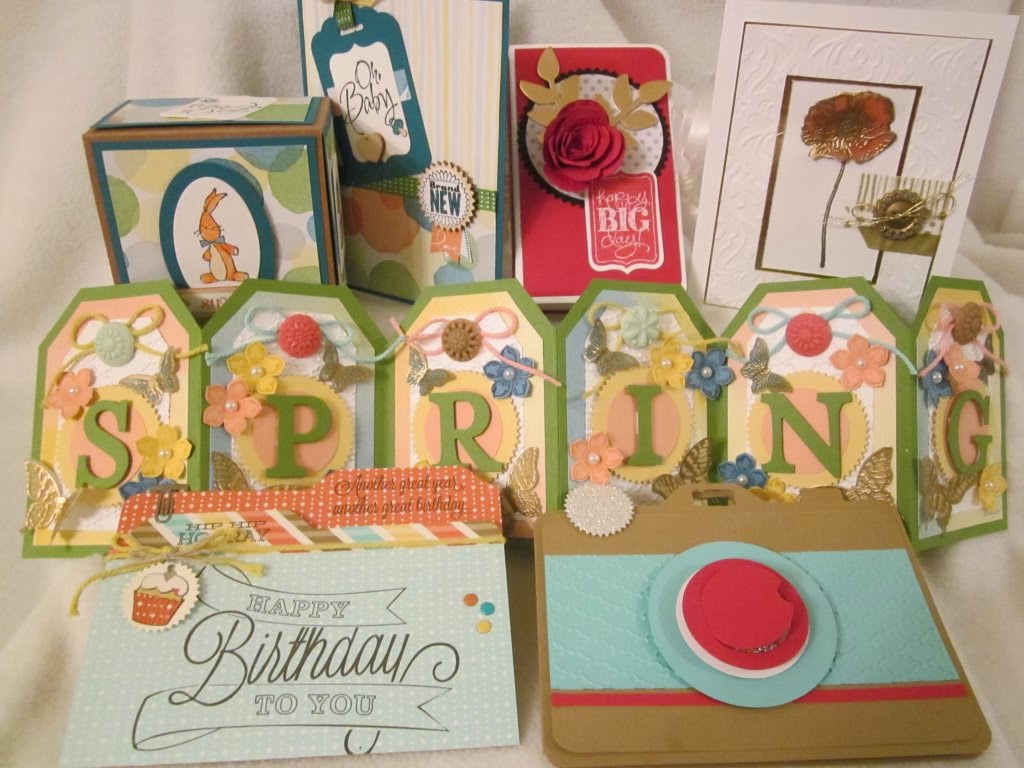
So here you have it... three cards all made with a different technique and embossing folder.
The first card (above) uses the beautiful Tulip embossing folder. I have used it to create a 4 1/4" square card instead of the regular 4 1/4 x 5 1/2" size. I've also heat embossed the gorgeous elephants with the new melon mambo embossing powder. Aren't they sweet?!

Next up is a technique where you emboss only parts of the folder pattern...
I have used an oval shim to create the blank space in the centre of the card. Pretty cool huh. I've also sponged over the embossing to give the card some colour and more defined texture. This is so simple but isn't it effective. I have embossed and sponged the envelope flap to match too. This is a great card to have on standby for those birthdays we all seem to forget.

Lastly is a technique where you brayer colour onto your embossing folder before you put it through the Big Shot...
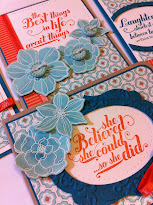
I love this technique. It makes the embossing really pop from the card. Here I've used the new folder in the latest mini called 'Flower Garden'. It's much prettier than my garden currently which is in dire need of weeding!

Interested in attending the class? Email me to register!
Dates: Wednesday 8th June/ Thursday 9th June, 7 - 9.30pm.
Cost: $15.00

Thursday, May 26, 2011

My Punch Art Pussy Cat

I had meant to post my next class today but for some reason I can't upload the photos to my desktop. So instead, I am posting this card I created for my lovely upline Carol.
Carol recently lost her furry craft room companion called Max. Whenever I have visited Carol, Max has always been there. Lounging on the computer desk, sleeping on the sunny counter or rubbing around my legs for attention. Max was gorgeous and lovable and he knew it!
I know what it's like to lose your constant companion so I made this card to let Carol know I was thinking of her.
I'm really pleased with how this card turned out. It's fairly simple but then a card doesn't have to be complicated to convey it's message.
I've used oval punches for the legs and head and used the wings from the bird punch for the ears. I hand cut the tail, whiskers and body. The paws are half an oval.
Hopefully tomorrow I will have some photos of my next class. I'll give you a hint... it's all to do with embossing folders!

Thursday, May 19, 2011

Sad To See Ewe Go

Today's post is a little sad for me. My friend Suzy from home is leaving today :(. I can't believe how fast the four weeks have gone.
This card is made with a non SU! stamp set but the sheep reminded me of New Zealand where there are more sheep than people (and they were just too cute to leave on the shelf, so I had to buy it!).
So Suzy, this post is for you. Thank you for the last four weeks. For all the laughter and tears and chocolate we have shared. I'm going to miss you. But know that I love "ewe" very much and we are all under the same sky xox.

Wednesday, May 18, 2011

Simple and Sweet

Today's post is a quick and easy card I made using some retired DSP I had. Actually, come to think of it, everything I've used on this card is retired... DSP and stamp sets!
I thought the colours were bright and cheery and could chase the rain we are currently having, away. So here you go, wishing you blue skies and a sunny day :)

Tuesday, May 17, 2011

Celebrating Love

Wedding anniversaries are our way of celebrating two people's special day. To let them know we recognise their commitment to each other through the years. I was asked to make a wedding anniversary card and this is what I came up with. I saw the card idea when I was at my upline Carol's, and thought it was lovely. Click on the link to check out Carol's gorgeous pink and grey version!

The two hearts hide one side of the ribbon opening. You untie the ribbon to reveal the inside...
I did lots of clear embossing on this card to give it some subtle elegance. The colours used are Riding Hood Red and Very Vanilla. A really beautiful combination. Thanks for taking a peek!

Monday, May 16, 2011

For All Your Hard Work

Today's card is one I made for a customer who graduated last week from nursing. I saw this idea here and knew it was perfect for what I wanted.
Congratulations Karine, I hope you enjoyed your special day!!!

Sunday, May 15, 2011

Daughterly Love


Today's post is going to be a very quick one I am afraid. We have got back from our road trip and I am a little weary. Well actually, alot weary but I am determined to post each day for a month so a quick post is better than none!
This is the card one of my DD's made and gave me for Mother's Day.
This is the inside. I have to say that my DD who gave me this one does not usually make cards so this one is all the more beautiful because she took the time to do it just for me :) Thank you Miss A for the beautiful card and for being such a wonderful daughter.

Saturday, May 14, 2011

Our Road Trip

As promised yesterday, here are a few photos from Suzy and my road trip to Maine.


The first photo is one of the many flowering Cherry blossoms we saw. They are so pretty and smell wonderful!

Next we have one of the many beautiful views of the ocean here in Ogunquit. As soon as we hopped out of the car you could smell the sea air. My how I have missed it!
We gave the beach a test run and it was glorious. Soft sand that was heavenly to walk on. Even though it was windy and a tad cold, we braved the elements and paddled in the ocean.

It's been a very long day so I'll keep this post short. Have to say though, we are loving Maine!

Friday, May 13, 2011

No Photos Today

I don't have any photos to post today. I tried posting this morning but Blogger wasn't working so am having to post now. Normally this wouldn't be an issue as I have photos on my computer to upload, but Suzy and I are on a road trip and I have my laptop with me.
We have just arrived at possibly the most beautiful town in Maine. It is a small town called Ogunquit and it is quaint, beautiful and by the sea!!! We are going to head out shortly to explore so will post photos when I get back home and can download them. The beach here is apparently one of the ten best beaches in the States. We will give you the Kiwi verdict once we have seen the beach!
Just to tempt you, imagine a picturesque seaside town in an American movie and upscale it. that's what this place is like... BE-U-T-FUL!

Thursday, May 12, 2011

My Lovely Ladies!

Aren't these flowers gorgeous?!
I just love them. These were a gift for me last night from one of the ladies that attended the class. She can't have them in her house so she likes to give them to people. Lucky me!!!
They are so cheery. Thanks Wanda for brightening my day!

Wednesday, May 11, 2011

'Open Sea' Class Projects

Today's post is to give you a wee peek at some of the goodies you'll be making in the next All day class. These are the three cards and the satchel is to the right. I love how these turned out. Great for guys of any age.
I have used the new matching 'Open Sea' DSP and the delicious Baker's Twine from the latest mini catalogue.
Like what you see? Sign up for my class!

Tuesday, May 10, 2011

Just Tagging Along

Happy Tuesday!
We have rain today and it is a little chilly but I have Suzy here and time spent with her is like sunshine with the rain!
Even though Suzy is here on holiday, I have jobs that I need to do. While I am working on those projects, this is what Suzy does. She rummages through my scrap box and makes tags!
Aren't they sweet?!
So next time you go to throw away a piece of paper because it is too small to do much with, ask yourself if you could make a tag from it!

Monday, May 9, 2011

Black Sheep, White Sheep

Over the weekend, I made two cards for people I know who knit. I didn't want to make two the same (though that would have been easier), so came up with the idea of making one based on a black sheep and the other based on a white sheep.
Above is the card I came up with for my black sheep. Having seen a few sheep in my time I know that "black" sheep aren't really black, but more of a dirty brown, greyish colour.
I inked and sponged the images for the card and distressed the edges. I love the way it turned out. I also made some gift tags to send as well...

Now for my white sheep version...
This version is very white with clean lines a fresh feel. Here's the tags I made to go with this one:
I love that even though the layout is the same for both cards, the end results are quite different. So what kind of sheep are you? Black sheep or white sheep?!

Sunday, May 8, 2011

Three Amigos

Today is Mother's day and I received some absolutely beautiful cards from my daughters. I love nothing more than seeing what they have created. Creations from the heart. I will post their cards soon, but today's post is the photo from Truro.

So here it is... the photo of Carol, Suzy and myself. We are all smiling and happy because we are doing something we love. Spending time with friends and creating.
Can you see some of Carol's creations behind us? This is only a small part of her room. Every time I visit Carol, I make a bee line for her display areas so I can see what beautiful things she has created. Carol uses different colours to me and her style is always so tasteful and classy. They inspire me to step out of my comfort zone and try something new. Thank you Carol for your inspiration and for letting a couple of Kiwi's visit your nest!

Saturday, May 7, 2011

Anniversary Wishes

I had my post today all planned out... I had a photo ready of Carol, myself and Suzy (in Carol's wonderful craft room) that I wanted to use. Problem is I left it on Carol's PC and today we travelled back to NB. I will get Carol to email it to me so I can post it at a later date.

So, today's post is of a custom order I recently did. I was given the colour specifics by the client and went to town with the rest. I wanted a large single heart image for the card and this Valentines stamp was my first choice. What you can't see is the Valentine's sentiment that goes with the heart. I covered the sentiment with the ribbon. A wonderful excuse to add some ribbon! Add some embossing and a little tag and viola, one wedding anniversary card.

Friday, May 6, 2011

Skater Boy Crimped

It's Friday morning and Suzy and I are having the best time with Carol here in Truro. Of course, I knew it would be wonderful because it always is when Carol (or any ASI member!) and I get together :).
Here is the last project for the Crimping class. This funky card is actually made from and envelope. How cool is that?!
Here's what the rest of the card looks like...
That's it for today, as I have to make the most of being in Carol's craft room (sigh). Have a great weekend and thanks for taking a peek!

Thursday, May 5, 2011

Another Crimped Card Project

Today's greetings come from Truro!
My NZ friend and I did a little road trip to visit my wonderful upline Carol who lives there.

I am determined to post something every day so had to be organised with my photos. I decided that emailing the photos to myself was the easiest way to have photos to post and here is today's offering.
This is one of the cards I made for the Crimping class. I had seen a Christmas card done with the crimped pattern and thought the sympathy sentiment would lend itself nicely to the same thing.
I think the crimping adds a little bit of subtle interest that is nice.

That's it for today but I'll have another post for you all tomorrow. Thanks for stopping by!

Wednesday, May 4, 2011

Candy Bag Crimped!


Isn't this the cutest candy bag you've seen for a while?
I just love it! I love the shape and the different contours, but especially the crimped ends!!!
When I made this bag I filled it and crimped it closed. In hindsight I should have left it empty and closed it up, because now I'll have to rip the bag open to get the candy out. It's too cute to rip open (Of course opening it will depend on how desperate I am for candy)!
So this is project one for the Crimping class. Cute, cute, crimper cute!

Tuesday, May 3, 2011

Crazy For Crimping!


I finally did it... I purchased a crimper. It has been on my wish list for the longest time, but no more.
I have had lots of fun trying ideas for a class and this is what I have come up with. I'm going to be a tease and not post all the photos of the projects today like I usually do. I'm going to spread them out for my daily postings!
I will say the class consists of two cards (one is not shown) and the cutest candy container (possibly) ever!
You'll have to come back tomorrow to see what I mean LOL.

Monday, May 2, 2011

Key To My Chocolate Jar!


As part of a recent bulk buy I took part in, I got these cute glass jars. I used them to make my sewing kits with the pin cushion on the top but had some spare ones and wanted to create something with a more vintage feel. I saw the idea for these here (Thanks for the idea Monika!) and just changed it to suit what I had on hand. I thought one of the trinket keys would make a cute embellishment and it means I get to keep one as I am keeping the jar!
The original idea had the wider striped ribbon cut in half so I made some up with that idea too...
Aren't they pretty? I do love the 'Love Letter' DSP teamed with the 'First Edition' DSP. Now I just need to fill these ones with chocolates...hmmm, maybe not!

Sunday, May 1, 2011

Sunshine and Spring

Happy Sunday everyone :).
It is a glorious Spring day here so this is a quick post before we head out to enjoy the sunshine.

I love pairing Rich Razzleberry and Old Olive together. There is something about the richness of the colours that strikes me. I've paired them together here for this Spring time card for a friend. I water coloured the stamped image and cut it out with the Butterfly die in the Big Shot. There was a small piece of water colouring leftover so I punched out two tags to add to the ribbon. I stamped the background with 'En Francais' and sponged around the edges. I also sponged around the tags and the butterfly, adding some linen thread to make the antenna.
Thanks for taking a peek!