Inky Moose On Facebook

Find me on Facebook where you can get inspiration, class updates and other crafty goodness!

Sunday, January 30, 2011

Bringing on Spring!


I have just returned from a fantabulous (Thanks Linda for the word!) weekend with the other members of the Atlantic Stampers Ink (ASI) team. Whenever we get together it is such good fun and I always come away amazed and inspired by the wonderful creations that the other ladies come up with.
I can now share my Shoebox swap that I took along for the ladies to make. I knew we all had the gorgeous Tulip embossing folder and I have been wondering if it is possible to create different sized frames with it. After a bit of searching on the demonstrator web I have discovered that you can!! So that's what my project is based around...

I created this cute 4x4" card using the 'Easter Blossoms' stamp set and look at the frame, it fits perfectly around the image!! As an extra surprise I made each of the ladies a gift basket to match. It is made using one of the tags from the Two Tags die. Isn't it darling? I loved it so much I even parted with some of my precious Baja Breeze corduroy brads as the finishing touch! I'm pleased to say that the ladies loved theirs too and I know the brads have gone to good homes!
Thanks ladies for yet another wonderful weekend. Your creativity, generosity, and friendship mean so much to me :)

Tuesday, January 25, 2011

Sew Sweet and Stationary Too!


Here it is, the project for my March All Day Class. I have had such fun coming up with this.
Memories as a little girl, of watching my Grandmother sew have inspired me. I was constantly amazed by the beautiful garments she would create from just a few simple materials. If I was lucky enough, one of the creations would be for me!

For the class I have created a sewing kit (Box template was purchased here) with paper and accents galore - Wooden bobbins, ribbon, buttons, pins and all the beautiful sewing paraphernalia in the latest SU! mini.
The box itself is gorgeous with it's retro patterns and colours, but open it up and look what it hides:
Three levels of gorgeous papertrey creations. The top layer has four note cards and matching gift tags. I've included extra ribbon (I've included some dinky wood bobbins because they were just too cute to leave out!) and pins just in case they are called for.
Here's the four notecards:

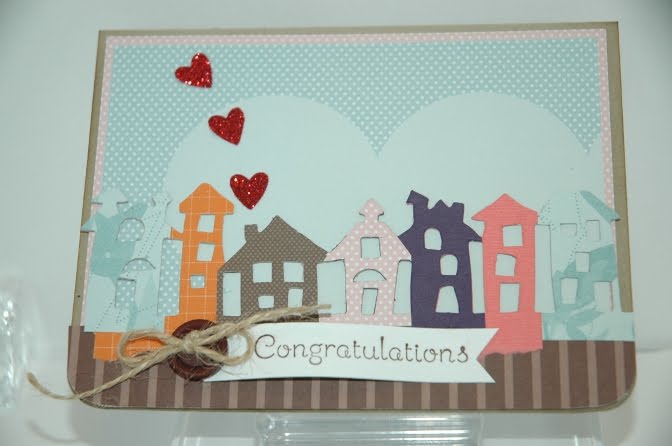
Level Two holds four full size cards, all as individual and unique as any fabric creation might be (Level three holds the envelopes). Here's Card One:No good seamstress can live without the tools of her trade and probably the most important of these tools is the sewing machine. This card is an ode to the sewing machine... Sturdy, straightforward and functional. But don't the ruffled ribbon and brads give a little hint of what is possible when imagination is added to the mix?!


For the next card I was inspired by the dressmakers dummy. I imagined a garment being stitched together and wanted to recreate that idea on a card.
I've ripped the fabric into strips and layered them along the bottom of the card to create "frills" on a skirt. I've made a fabric flower (centred with one of the funky fabric brads) to top it off. Add some buttons, lace and even some stitching, and this is what I came up with.

Card number three is inspired by the cutting and measuring that goes on when one wants to sew. A tape measure is all important and one will usually be found hanging around the seamstress's neck. Add pattern pieces oh so carefully cut and you have the beginnings of your garment. Add some thread and away you go.


Card Four is inspired by the extra little bits and pieces that go into making a garment. The finishing touches so to speak. I have always had a fascination for buttons and ribbon. Any excuse to buy some and the fancier the better! Add some fancy stitching and button DSP and this card goes from plain to glam in an instant! So there you have it, Sew sweet and stationary too!


Date: Saturday 26th March, 9.30am - 4.30pm.

Cost: $50. (This includes lunch so if you have any special dietary requirements, please contact me. Please also NOTE, the price of the class includes your own bottle of Tombo Adhesive that you will need for the class).

Email me at inkymoose@gmail.com to reserve your seat!


I'm Sorry For Your Loss

These are hard words to say and often times a card can express our sentiments when we can't.
That's the reason for my upcoming Sympathy Card class.
Here's what I came up with:


Layer upon layer of Whisper White card stock make up this card. I have added just the faintest hint of blue for the sentiment. To add a bit of interest I added some texture with pearls and ribbon. This card is simple yet so elegant.


For this card I used my favourite colour Baja Breeze (it reminds me of the ocean) with grey and white. It's a clean fresh look yet it has a softness about it that I think it is suitable for a sympathy card.


For the last card of the class I've used the pretty flower image from the new 'Thanks For Caring' stamp set (found in the new mini catalogue) as the main focal point. Teamed with Pink Pirouette' and white, another beautiful, heartfelt card.

Interested in attending the class?
Details are below:

Dates: Wednesday 16th /Thursday 17th February, 7pm - 9.30pm.
Cost: $12.
Email me at inkymoose@gmail.com to reserve your seat.

Monday, January 17, 2011

In My Thoughts


Today I made a card that I don't often make ... a sympathy card for a friend who had a sudden loss in their family.

I have to confess to finding it difficult creating something of beauty for such a sad occasion. There is so much I want to convey with a sympathy card and I want the card to be beautiful too (but not in the usual gorgeous, 'out there' kind of way). Often I find it hard to get the right balance of sentiment and artistry in a sympathy card but I think I managed to do so with this one. I like it's simplicity and the sense of peace I get when I look at it. I hope it brings a little peace and comfort to the recipients.

For this card I used one of my favourite SU! Sets - 'Branch Out' (it's retired but I just love it) and masked the landscape. The sentiment is from the set 'Thanks for Caring' in the new mini catty. I used a marker to colour the parts I wanted.

Thanks for taking a peek.

Thursday, January 13, 2011

Punch Buggy!


Isn't it cute? A VW car made from SU! punches. This idea came from the SU! Demo site. Whenever I need an idea (especially punch art) it's my "go-to" place for inspiration!

This is another card that will be winging its way to NZ for a nephew's birthday. It's for the brother of the Dino card, so that's why it's another punch art card. I couldn't send one one and not the other... it might start a feud!
The background paper is another piece from my stash. You know what I mean, those sheets of paper we see in a store and just have to have!
Thanks for taking a peek :)

Tuesday, January 11, 2011

Dino-mite Dino

I have several nephews having birthdays in the next few weeks so am in card production mode. I have had this dinosaur paper for the longest time and have been meaning to use it, but I either (a) forget that I have it (that's what happens when you have more supplies than you can mentally categorise!) or (b) just haven't got round to it yet. Well, that time has come and here's what I created.
I used the following SU! punches to make the T-Rex:
Body & Head - Extra large Oval
Teeth & Claws - Star
Eye - Circle from Itty Bitty punch set
Legs & Arm - Extra Large Oval off cuts
Neck - Large Oval

Inside the card I have put 'Happy Grreat Birthday'.
Thanks for taking a peek :)

Saturday, January 8, 2011

Happy New Home


One of my customers and her fiancée recently brought their first home and were moving in early this month. I wanted to make them a card to congratulate them on their new adventure and this is what I came up with.
I used some of the retired 'Sweet Pea' DSP to imitate the sky and I just had to use my house die again... I love it! Can you see I've added some glitter too with the wee hearts so there's a bit of bling but I don't have a mess to clean up. Woo hoo!
Thanks for taking a peek :)

Be mine, Valentine!


With Valentine's Day on the horizon, it means lots of pink and red and candy treats for my upcoming Valentine's class!
So what will you be making if you attend the class? Here goes:

The Heart Treat Cup card is too cute, especially filled with delicious peppermint drops. I've used the gorgeous embossing folder in the new mini to frame the flower and to make the treats stand out. Simple but oh so sweet!

Next is a magnetic memo board that you can put on your fridge or another metal surface. It is a CASE of one I got to make at the ASI team meeting last year. The one we made was for Christmas but I just couldn't fit it in my schedule so I saved it until now. I've used the new Glitter paper which I love!! I really like the look of glitter but I don't like the mess it can make. This paper solves my problem as it comes already glittered... Yay!

The last project for the Valentine's class is this sweet wee Bitty Box. I have cut out a heart window and covered it with acetate. Add some candy and a sweet crocheted flower and you have a beautiful wee gift that anyone would be thrilled to receive.
Class Details:

DATES: Wednesday 9th/Thursday 10th February.
TIME: 7 - 9.30 pm.
COST: $22.


If you are wanting to attend, email me to reserve your spot!

Sunday, January 2, 2011

Chocolate, mmmmm!


If you are anything like me, you got lots of chocolate for Christmas, but thats ok because one can never have too much of the stuff. Brown, dark or white... it's all good.
In the new upcoming mini catalogue from SU! there is a stamp set called 'Eat Chocolate' and I've created a class with it that I'm running later this month.
With such a delicious theme I wanted to incorporate as much chocolate (the real stuff) as possible. Here's a sneaky peek.
I've come up with a card that looks a bit like a bar of chocolate...
I hear you say "but we can't eat that". Well of course you are right. It's not until you open the card that you find the chocolate that you CAN eat!
Inside there is a pocket that actually holds 3 mini chocolate bars! What's even better is that the card is sized so it will fit into a regular sized envelope so you can send some chocolatey goodness to someone and make their day.

For the person that loves chocolate but doesn't want the calories, you can give them the following card:
The idea of the flower behind the sentiment came from an idea I saw on the demonstrator site. It's so pretty!
Now, if you wanted to send someone the above card AND some calories, you could team it up with this cute wee number:
I've made a tray that holds 4 Hershey's Nuggets, put it in a cellophane bag then decorated it.
Here's a closer look at the topper:
So there you have it, a sneak peek, gorgeous creations and chocolates... what more could you possibly want?!
Oops, maybe you'd like the class details:

Dates: Wednesday 19th/Thursday 20th January, 7 - 9.30pm.
Cost: $15 (and yes the chocolates are included!)
Email me to reserve your seat!